
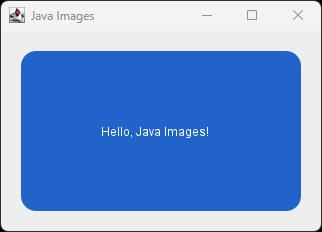
In this example, you will draw a blue card in memory, save it as a PNG file, open that file, and show the loaded image in a Swing window. The program creates its own image.
What is a pixel?
A raster image is a grid of pixels. In a BufferedImage, the top-left pixel is at (0, 0). The x coordinate increases to the right, and the y coordinate increases downward.
This example uses BufferedImage.TYPE_INT_ARGB. Each pixel has four values for alpha, red, green, and blue. Alpha controls opacity. A value of 0 means fully transparent, and 255 means fully opaque. The program draws inside the image and leaves a transparent border, which PNG preserves when you save the file.
Java example
Save the following code as JavaImageBasics.java.
package org.kodejava.awt.image;

import javax.imageio.ImageIO;
import javax.swing.ImageIcon;
import javax.swing.JFrame;
import javax.swing.JLabel;
import javax.swing.SwingUtilities;
import java.awt.Color;
import java.awt.Graphics2D;
import java.awt.GraphicsEnvironment;
import java.awt.RenderingHints;
import java.awt.image.BufferedImage;
import java.io.File;
import java.io.IOException;

public class JavaImageBasics {
    public static void main(String[] args) throws IOException {
        BufferedImage image = createImage();

        File file = new File("java-image.png");
        if (!ImageIO.write(image, "png", file)) {
            throw new IOException("PNG writer is unavailable");
        }

        BufferedImage loadedImage = ImageIO.read(file);
        if (loadedImage == null) {
            throw new IOException("Unrecognized image format: " + file);
        }

        System.out.printf("%s: %d x %d pixels%n",
                file.getName(), loadedImage.getWidth(), loadedImage.getHeight());

        if (!GraphicsEnvironment.isHeadless()) {
            SwingUtilities.invokeLater(() -> showImage(loadedImage));
        }
    }

    private static BufferedImage createImage() {
        BufferedImage image = new BufferedImage(
                320, 200, BufferedImage.TYPE_INT_ARGB);

        Graphics2D graphics = image.createGraphics();
        try {
            graphics.setRenderingHint(RenderingHints.KEY_ANTIALIASING,
                    RenderingHints.VALUE_ANTIALIAS_ON);
            graphics.setColor(new Color(33, 99, 200));
            graphics.fillRoundRect(20, 20, 280, 160, 30, 30);
            graphics.setColor(Color.WHITE);
            graphics.drawString("Hello, Java Images!", 100, 105);
        } finally {
            graphics.dispose();
        }

        return image;
    }

    private static void showImage(BufferedImage image) {
        JFrame frame = new JFrame("Java Images");
        frame.setDefaultCloseOperation(JFrame.EXIT_ON_CLOSE);
        frame.add(new JLabel(new ImageIcon(image)));
        frame.pack();
        frame.setLocationRelativeTo(null);
        frame.setVisible(true);
    }
}
Run the program
Open a terminal in the folder containing the Java file and run these commands.
javac JavaImageBasics.java
java JavaImageBasics
The program writes java-image.png to the working directory and prints the dimensions of the loaded file.
java-image.png: 320 x 200 pixels
On a desktop, a Swing window shows the blue card. The transparent border lets the component background show through. In a headless environment, the program still writes and reads the file and prints its dimensions.
How it works
- Create.
createGraphics()returns aGraphics2Dobject that draws directly into theBufferedImage. Thefinallyblock callsdispose()to release the drawing context. - Save.
ImageIO.write()selects an encoder using the format name"png". It returnsfalseif no suitable writer is available. - Load.
ImageIO.read()decodes the file into a newBufferedImage. It returnsnullif no installed reader recognizes the data. An error while opening or reading the file can throw anIOException. - Display.
ImageIconwraps the loaded image, andJLabeldisplays the icon.SwingUtilities.invokeLater()creates the window on Swing’s Event Dispatch Thread after the file has been read.
Try it yourself
Change the image size to 480 × 240 pixels. Resize the blue rectangle so it still has a 20-pixel margin on all sides. Then print the alpha value for the top-left pixel and for a pixel inside the blue rectangle.
int cornerAlpha = loadedImage.getRGB(0, 0) >>> 24;
int cardAlpha = loadedImage.getRGB(30, 50) >>> 24;
System.out.printf("Corner alpha = %d, card alpha = %d%n",
        cornerAlpha, cardAlpha);
Add this snippet after the null check in main(). The expected values are 0 for the transparent corner and 255 for the solid blue area.
Maven dependencies
AWT, Swing, and Image I/O are part of the JDK’s java.desktop module. This example needs no extra Maven dependencies. If you use a modular project, add requires java.desktop; to your module declaration.
References
Next week — How do I choose an image file format in Java?