How to create JSP error page to handle exceptions?

In this example you will learn how to handle exceptions in JSP page. JSP have a build-in mechanism for error handling which is a special page that can be used to handle every error in the web application. To define a page as an error page we use the page directive and enable the isErrorPage attribute by setting the value to true.

Here is an example of a JSP error page:

<%@ page contentType="text/html;charset=UTF-8" %>
<%@ page isErrorPage="true" %>
<!DOCTYPE html>
<html lang="en">
<head>
    <title>Error Page</title>
</head>
<body>
<h1>An error has occurred.</h1>

<div style="color: #F00;">
    Error message: <%= exception.toString() %>
</div>
</body>
</html>

We have defined the error page. The next steps is how to tell other JSP pages to use the error page to handle errors when uncaught exception occurred. To do this we again use the page directive. Set the errorPage attribute of this directive to point to the error page. For instance in the example below we set it to errorPage.jsp.

If we try to access the errorTest.jsp as shown in the snippet below. It will throw an exception because we try to convert an invalid string into a number. Because we are not handling the error in the page the error page will come up and show the exception messages.

<%@ page contentType="text/html;charset=UTF-8" %>
<%@ page errorPage="/errorPage.jsp" %>
<html lang="en">
<head>
    <title>My Sample Page</title>
</head>
<body>
<h1>This page throws an error:</h1>

<%
    int number = Integer.parseInt("Hello, World!");
%>
</body>
</html>
JSP Error Page Demo

JSP Error Page Demo

How to include page dynamically in JSP page?

In this example we are going to learn how to use <jsp:include> action. This action can be used to include resource dynamically to our JSP pages. For example the resource can be another JSP page, a servlet or event a static html pages. But to make it enable to be processed as a JSP page, such as accepting parameters, we must use the .jsp as the file extension. If we use other extension such as .jspf, it will be processed as a static page.

The other things to note is that using the <jsp:include> action will process the page inclusion at the request time. This is why we can pass parameters to the included page using the <jsp:param>. The value can be read by obtaining the parameter from the request object or using expression language variable param.

But if we use the <%@ include %> directive the inclusion of the page happen when it translated into a Servlet. See the following example about the <%@ include %> directive: How do I include a page fragment into JSP?

<%@ page contentType="text/html;charset=UTF-8" %>
<!DOCTYPE html>
<html lang="en">
<head>
    <title>JSP - Include Demo</title>
</head>
<body>

Lorem Ipsum

<jsp:include page="jspf/footer.jsp">
    <jsp:param name="year" value="2021"/>
</jsp:include>

</body>
</html>

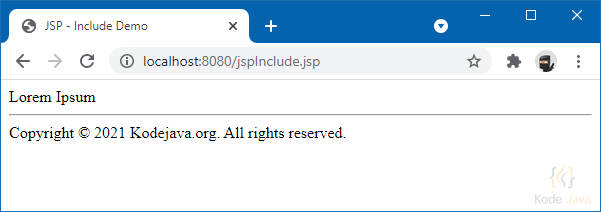
Below is the content of our footer.jsp page. In this page we display the footer information with a parameter read from the request object.

<%@ page contentType="text/html;charset=UTF-8" %>
<hr/>
Copyright © ${param["year"]} Kodejava.org. All rights reserved.

This example will give you the following result in the browser:

JSP Include Action Demo

JSP Include Action Demo

How do I forward request to another page in JSP?

To forward a request from one page to another JSP page we can use the <jsp:forward> action. This action has a page attribute where we can specify the target page of the forward action. If we want to pass parameter to another page we can include a <jsp:param> in the forward action. But make sure that the forward page is a JSP page to enable the parameters to be processed.

<%@ page contentType="text/html;charset=UTF-8" %>
<!DOCTYPE html>
<html lang="en">
<head>
    <title>JSP - Forward Demo</title>
</head>
<body>

<jsp:forward page="message.jsp">
    <jsp:param name="message" value="Welcome!"/>
</jsp:forward>

</body>
</html>

And here is how to read the parameters in the message.jsp.

<%@ page contentType="text/html;charset=UTF-8" %>
<!DOCTYPE html>
<html lang="en">
<head>
    <title>Message: ${param["message"]}</title>
</head>
<body>
Message: ${param["message"]}
</body>
</html>
jsp:forward Demo

jsp:forward Demo

When you access the jspForward.jsp page in the web browser what you will see is the content of the message.jsp page. This is because the <jsp:forward> action forward your request to the message.jsp before returning the response back to the browser for display.

How do I use jsp:useBean action in JSP pages?

In this example you will learn how to use the <jsp:useBean>. We can use the useBean action to create a scripting variables. To define the variable name we use the id attribute of this action. The class attribute define the type of this variable. We can also define the scope of the variable using the scope attribute.

As an example in the code snippet below we create a variable name now and declare it to hold a java.util.Date instance. And then we use a JSP expression to print out the value.

<%@ page contentType="text/html;charset=UTF-8" %>
<!DOCTYPE html>
<html lang="en">
<head>
    <title>JSP - useBean Demo</title>
</head>
<body>

<jsp:useBean id="now" class="java.util.Date"/>

Now is: <%= now %>

</body>
</html>
jsp:useBean Demo

jsp:useBean Demo

How to set and get properties of a bean in JSP?

In this example you will learn how to set and get the value of Java object properties that you define in a JSP pages. For this example, let’s first start by creating a variable that we named customer, that will have a type of Customer class. To create this variable we use the <jsp:useBean> action.

After we create the customer variable we can set the property value of the customer bean using the <jsp:setProperty> action. And to get the property value of the customer bean we use the <jsp:getProperty> action.

The name attribute in the setProperty and getProperty action refer to our customer bean. The property attribute tells which property we are going to set or get. To set the value of a property we use the value attribute.

<%@ page contentType="text/html;charset=UTF-8" %>
<!DOCTYPE html>
<html lang="en">
<head>
    <title>JSP - Bean Property Demo</title>
</head>
<body>

<jsp:useBean id="customer" class="org.kodejava.servlet.support.Customer"/>
<jsp:setProperty name="customer" property="id" value="1"/>
<jsp:setProperty name="customer" property="firstName" value="John"/>
<jsp:setProperty name="customer" property="lastName" value="Doe"/>
<jsp:setProperty name="customer" property="address" value="Sunset Road"/>

Customer Information: <%= customer %><br/>
Customer Name: <jsp:getProperty name="customer" property="firstName"/>
<jsp:getProperty name="customer" property="lastName"/>

</body>
</html>

And here is the code for our Customer bean. This bean contains property such as the id, firstName, lastName and address.

package org.kodejava.servlet.support;

public class Customer {
    private int id;
    private String firstName;
    private String lastName;
    private String address;

    public Customer() {
    }

    public int getId() {
        return id;
    }

    public void setId(int id) {
        this.id = id;
    }

    public String getFirstName() {
        return firstName;
    }

    public void setFirstName(String firstName) {
        this.firstName = firstName;
    }

    public String getLastName() {
        return lastName;
    }

    public void setLastName(String lastName) {
        this.lastName = lastName;
    }

    public String getAddress() {
        return address;
    }

    public void setAddress(String address) {
        this.address = address;
    }

    @Override
    public String toString() {
        return "Customer{" +
                "id=" + id +
                ", firstName='" + firstName + '\'' +
                ", lastName='" + lastName + '\'' +
                ", address='" + address + '\'' +
                '}';
    }
}

We access the JSP page we will see the following output:

Customer Information: Customer{id=1, firstName='John', lastName='Doe', address='Sunset Road'}
Customer Name: John Doe
JSP Bean Property Demo

JSP Bean Property Demo

How to disable scripting elements in JSP pages?

With the introduction of Expression Language in JSP 2.0 it is recommended to use the EL instead of using a scripting elements / scriptlets. That means if we want to access a server-side objects it is recommended to use EL then to write some Java codes in the JSP pages.

For this purpose in JSP 2.0 we are given a feature to disable the scripting elements by defining a scripting-invalid element within the <jsp-property-group> in the deployment descriptor (web.xml) file.

Here is the JSP configuration that you need to add in the web.xml file:

<web-app xmlns="http://xmlns.jcp.org/xml/ns/javaee"
         xmlns:xsi="http://www.w3.org/2001/XMLSchema-instance"
         xsi:schemaLocation="http://xmlns.jcp.org/xml/ns/javaee http://xmlns.jcp.org/xml/ns/javaee/web-app_4_0.xsd"
         version="4.0">
    <display-name>JSP Examples</display-name>

    <jsp-config>
        <jsp-property-group>
            <url-pattern>*.jsp</url-pattern>
            <scripting-invalid>true</scripting-invalid>
        </jsp-property-group>
    </jsp-config>
</web-app>

When you try to request a JSP page that have a scripting elements in, it will give you an error message like this:

HTTP Status 500 - /sessionWriteRead.jsp (line: 10, column: 2) Scripting elements ( <%!, <jsp:declaration, <%=, <jsp:expression, <%, <jsp:scriptlet ) are disallowed here.

How do I add comment in JSP pages?

In this example you’ll see how to add comments in JSP page / JSP scriptlets. To add comments we can use either the JSP comment style or HTML comment style. The different between this is that the HTML comment will be sent or included in the webpage while the JSP comment is not included in the webpage.

The JSP comment style start with the <%-- and end with the --%>. To create an HTML comment style we can use the <!-- and closed by the -->. Beside this two comment styles you can still use the comment block that we use in our Java code in the JSP scriptlets.

<%@ page import="java.util.Date" %>
<%@ page import="java.text.SimpleDateFormat" %>
<%@ page contentType="text/html;charset=UTF-8" %>
<!DOCTYPE html>
<html lang="en">
<head>
    <title>Commenting JSP Page</title>
</head>
<body>

<%--The JSP snippet below is used to print the current date--%>
<%
Date date = new Date();
SimpleDateFormat formatter = new SimpleDateFormat("EEE, dd/MM/yyyy");
%>

<%= "Today is: " + formatter.format(date) %>
</body>
</html>

What are the scripting elements in JSP page?

There are three types of scripting elements available when writing a JSP page. These scripting elements includes:

  • Scriptlets which is a block of Java code.
  • Expression that can be evaluated and the result is printed out.
  • Declarations can be used to declares variables or methods.

Scriptlets

A scriptlets is a block of Java code that begins with <% and closed by %>. We can have multiple block of scriptlets inside a JSP page. The following example show you how to write a scriptlets:

<%@ page import="java.text.DateFormat" %>
<%@ page import="java.text.SimpleDateFormat" %>
<%@ page import="java.util.Date" %>
<%@ page import="java.util.Calendar" %>
<%@ page contentType="text/html;charset=UTF-8" language="java" %>
<!DOCTYPE html>
<html>
<head>
    <title>JSP - Scripting Scriptlets</title>
</head>
<body>
<%
    DateFormat formatter = new SimpleDateFormat("EEE, dd/MM/yyyy HH:mm:ss");
    out.print(formatter.format(new Date()));
%>
<br/>
<%
    Calendar calendar = Calendar.getInstance();
    out.print(formatter.format(calendar.getTime()));
%>
</body>
</html>

In the scriptlets above we can use the formatter object on the first scriplet to be used in the second scriptlet. Any objects or variables declared in the first scriptlet is available on the second scriptlet.

Expression

To create an expression in JSP we can use the <%= and closed by the %>. The expression in this kind of block will be evaluated and the value is printed out as the JSP page output. We can say that the expression block is a shortcut for the out.print() method in JSP page. You also notice that an expression doesn’t end with a semicolon.

Here is an example of expression in JSP page:

<%@ page import="java.util.Date" %>
<%@ page contentType="text/html;charset=UTF-8" language="java" %>
<!DOCTYPE html>
<html>
<head>
    <title>JSP - Scripting Expressions</title>
</head>
<body>
Today is: <%= new Date() %><br/>
Session Id: <%= session.getId() %><br/>

<%--The above expression is equals with the following scriptlets--%>

Today is: <% out.print(new Date()); %><br/>
Session Id: <% out.print(session.getId()); %>
</body>
</html>

Declarations

The last scripting elements is this declarations. The declarations elements starts with a <%! and ends with %>. We can use this block to declare variables and methods that can be used in a JSP page. Let’s see an example below:

<%@ page import="java.util.Date" %>
<%@ page contentType="text/html;charset=UTF-8" language="java" %>
<!DOCTYPE html>
<%!
    public int add(int number1, int number2) {
        return number1 + number2;
    }

    public Date getDate() {
        return new Date();
    }
%>
<html>
<head>
    <title>JSP Declarations</title>
</head>
<body>
Today is: <%= getDate() %><br/>
20 + 10 = <%= add(20, 10) %>
</body>
</html>

How do I delete a cookie in Servlet?

The Servlet API doesn’t provide a direct way to delete a cookie in a Servlet application. If you want to delete a cookie you have to create a cookie that have the same name with the cookie that you want to delete and set the value to an empty string. You also need to set the max age of the cookie to 0. And then add this cookie to the servlet’s response object.

Let’s see the code example below:

package org.kodejava.servlet;

import javax.servlet.ServletException;
import javax.servlet.annotation.WebServlet;
import javax.servlet.http.Cookie;
import javax.servlet.http.HttpServlet;
import javax.servlet.http.HttpServletRequest;
import javax.servlet.http.HttpServletResponse;
import java.io.IOException;

@WebServlet(name = "DeleteCookieServlet", urlPatterns = "/deleteCookie")
public class DeleteCookieServlet extends HttpServlet {
    protected void doGet(HttpServletRequest request, HttpServletResponse response)
            throws ServletException, IOException {

        //
        // To delete a cookie, we need to create a cookie that have the same
        // name with the cookie that we want to delete. We also need to set
        // the max age of the cookie to 0 and then add it to the Servlet's
        // response method.
        //
        Cookie cookie = new Cookie("username", "");
        cookie.setMaxAge(0);
        response.addCookie(cookie);
    }
}

Maven dependencies

<dependency>
    <groupId>javax.servlet</groupId>
    <artifactId>javax.servlet-api</artifactId>
    <version>4.0.1</version>
</dependency>

Maven Central

How do I obtain ServletContext of another application?

The ServletContext.getContext(String uripath) enable us to access servlet context of another web application deployed on the same application server. A configuration need to be added to enable this feature.

In the example below we will forward the request from the current application to the /otherapp/hello.jsp page. We place a string in the request object attribute of the current application and going to show it in the hello.jsp page.

package org.kodejava.servlet;

import javax.servlet.RequestDispatcher;
import javax.servlet.ServletContext;
import javax.servlet.ServletException;
import javax.servlet.annotation.WebServlet;
import javax.servlet.http.HttpServlet;
import javax.servlet.http.HttpServletRequest;
import javax.servlet.http.HttpServletResponse;
import java.io.IOException;

@WebServlet(urlPatterns = {"/context"})
public class GetAnotherContextServlet extends HttpServlet {
    protected void doGet(HttpServletRequest request, HttpServletResponse response)
            throws ServletException, IOException {

        // Get ServletContext of another application on the same Servlet
        // container. This allows us to forward request to another application
        // on the same application server.
        ServletContext ctx = request.getServletContext().getContext("/otherapp");

        // Set a request attribute and forward to hello.jsp page on another 
        // context.
        request.setAttribute("MESSAGE", "Hello There!");
        RequestDispatcher dispatcher = ctx.getRequestDispatcher("/hello.jsp");
        dispatcher.forward(request, response);
    }
}

To enable this feature in Tomcat we need to enable the crossContext attribute by setting the value to true, the default value is false. Update the server.xml file to add the following configuration inside the <Host> node.

<Context path="/webapp" debug="0" reloadable="true" crossContext="true"/>

Maven dependencies

<dependency>
    <groupId>javax.servlet</groupId>
    <artifactId>javax.servlet-api</artifactId>
    <version>4.0.1</version>
</dependency>

Maven Central