
package org.kodejava.swing;

import javax.swing.*;
import java.awt.*;

public class WindowTaskbarFlash extends JFrame {
    private WindowTaskbarFlash() throws HeadlessException {
        initUI();
    }

    public static void main(String[] args) {
        SwingUtilities.invokeLater(
                () -> new WindowTaskbarFlash().setVisible(true));
    }

    private void initUI() {
        setDefaultCloseOperation(WindowConstants.EXIT_ON_CLOSE);
        pack();
        setSize(200, 200);
        setState(Frame.ICONIFIED);

        // Demonstrate flashes the application window task bar
        // by calling the toFront method every 5 seconds.
        Timer timer = new Timer(5000, e -> toFront());
        timer.start();
    }
}
How do I build SqlSessionFactory without XML?
MyBatis comes with a complete configuration classes that allows us to create a configuration object programmatically without using the XML file. In this code snippet you’ll see how to create a SqlSessionFactory object without XML configuration file.
We start by obtaining a javax.sql.DataSource object. Then we create a TransactionFactory object. With these two objects we can then create an Environment object and specify its name, such as development, for development environment. The final step is to create the Configuration object using the previously created environment.
In the Configuration object we can define information such as the type aliases and register all the MyBatis mappers.
package org.kodejava.mybatis;

import org.apache.commons.dbcp2.BasicDataSource;
import org.apache.ibatis.mapping.Environment;
import org.apache.ibatis.session.Configuration;
import org.apache.ibatis.session.SqlSession;
import org.apache.ibatis.session.SqlSessionFactory;
import org.apache.ibatis.session.SqlSessionFactoryBuilder;
import org.apache.ibatis.transaction.TransactionFactory;
import org.apache.ibatis.transaction.jdbc.JdbcTransactionFactory;
import org.apache.ibatis.type.TypeAliasRegistry;
import org.kodejava.mybatis.support.Record;

import javax.sql.DataSource;

public class BuildSqlSessionFactory {

    public static void main(String[] args) {
        // Get DataSource object.
        DataSource dataSource = BuildSqlSessionFactory.getDataSource();

        // Creates a transaction factory.
        TransactionFactory trxFactory = new JdbcTransactionFactory();

        // Creates an environment object with the specified name, transaction
        // factory and a data source.
        Environment env = new Environment("dev", trxFactory, dataSource);

        // Creates a Configuration object base on the Environment object.
        // We can also add type aliases and mappers.
        Configuration config = new Configuration(env);
        TypeAliasRegistry aliases = config.getTypeAliasRegistry();
        aliases.registerAlias("record", Record.class);

        config.addMapper(RecordMapper.class);

        // Build the SqlSessionFactory based on the created Configuration object.
        // Open a session and query a record using the RecordMapper.
        SqlSessionFactory factory = new SqlSessionFactoryBuilder().build(config);

        try (SqlSession session = factory.openSession()) {
            RecordMapper mapper = session.getMapper(RecordMapper.class);
            Record record = mapper.getRecord(1L);
            System.out.println("Record = " + record);
        } catch (Exception e) {
            e.printStackTrace();
        }
    }

    /**
     * Returns a DataSource object.
     *
     * @return a DataSource.
     */
    public static DataSource getDataSource() {
        BasicDataSource dataSource = new BasicDataSource();
        dataSource.setUrl("jdbc:mysql://localhost/musicdb");
        dataSource.setUsername("music");
        dataSource.setPassword("s3cr*t");
        return dataSource;
    }
}
Below are the other supporting classes for the code above, Record and RecordMapper.
package org.kodejava.mybatis;

import org.apache.ibatis.annotations.Result;
import org.apache.ibatis.annotations.Results;
import org.apache.ibatis.annotations.Select;
import org.kodejava.mybatis.support.Record;

public interface RecordMapper {
    /**
     * Get a single record from the database based on the record
     * identifier.
     *
     * @param id record identifier.
     * @return a record object.
     */
    @Select("SELECT * FROM record WHERE id = #{id}")
    @Results(value = {
            @Result(property = "id", column = "id"),
            @Result(property = "title", column = "title"),
            @Result(property = "releaseDate", column = "release_date"),
            @Result(property = "artistId", column = "artist_id"),
            @Result(property = "labelId", column = "label_id")
    })
    Record getRecord(Long id);
}
package org.kodejava.mybatis.support;

import java.io.Serializable;
import java.util.Date;

public class Record implements Serializable {
    private Long id;
    private String title;
    private Date releaseDate;
    private Long artistId;
    private Long labelId;

    // Getters & Setters

    @Override
    public String toString() {
        return "Record{" +
                "id=" + id +
                ", title='" + title + '\'' +
                ", releaseDate=" + releaseDate +
                ", artistId=" + artistId +
                ", labelId=" + labelId +
                '}';
    }
}
Maven Dependencies
<dependencies>
    <dependency>
        <groupId>org.mybatis</groupId>
        <artifactId>mybatis</artifactId>
        <version>3.5.13</version>
    </dependency>
    <dependency>
        <groupId>org.apache.commons</groupId>
        <artifactId>commons-dbcp2</artifactId>
        <version>2.9.0</version>
    </dependency>
    <dependency>
        <groupId>com.mysql</groupId>
        <artifactId>mysql-connector-j</artifactId>
        <version>8.1.0</version>
    </dependency>
</dependencies>



How do I obtain ServletContext of another application?
The ServletContext.getContext(String uripath) enable us to access servlet context of another web application deployed on the same application server. A configuration need to be added to enable this feature.
In the example below we will forward the request from the current application to the /otherapp/hello.jsp page. We place a string in the request object attribute of the current application and going to show it in the hello.jsp page.
package org.kodejava.servlet;

import javax.servlet.RequestDispatcher;
import javax.servlet.ServletContext;
import javax.servlet.ServletException;
import javax.servlet.annotation.WebServlet;
import javax.servlet.http.HttpServlet;
import javax.servlet.http.HttpServletRequest;
import javax.servlet.http.HttpServletResponse;
import java.io.IOException;

@WebServlet(urlPatterns = {"/context"})
public class GetAnotherContextServlet extends HttpServlet {
    protected void doGet(HttpServletRequest request, HttpServletResponse response)
            throws ServletException, IOException {

        // Get ServletContext of another application on the same Servlet
        // container. This allows us to forward request to another application
        // on the same application server.
        ServletContext ctx = request.getServletContext().getContext("/otherapp");

        // Set a request attribute and forward to hello.jsp page on another
        // context.
        request.setAttribute("MESSAGE", "Hello There!");
        RequestDispatcher dispatcher = ctx.getRequestDispatcher("/hello.jsp");
        dispatcher.forward(request, response);
    }
}
To enable this feature in Tomcat we need to enable the crossContext attribute by setting the value to true, the default value is false. Update the server.xml file to add the following configuration inside the <Host> node.
<Context path="/webapp" debug="0" reloadable="true" crossContext="true"/>
Maven dependencies
<dependency>
    <groupId>javax.servlet</groupId>
    <artifactId>javax.servlet-api</artifactId>
    <version>4.0.1</version>
</dependency>

How do I unpack an ISO 8583 message?
The code snippet below will show you how to unpack ISO 8583 message.
package org.kodejava.jpos;

import org.jpos.iso.ISOException;
import org.jpos.iso.ISOMsg;
import org.jpos.iso.packager.GenericPackager;

import java.io.InputStream;

public class UnpackISOMessage {
    public static void main(String[] args) {
        UnpackISOMessage iso = new UnpackISOMessage();
        try {
            ISOMsg isoMsg = iso.parseISOMessage();
            iso.printISOMessage(isoMsg);
        } catch (Exception e) {
            e.printStackTrace();
        }
    }

    private ISOMsg parseISOMessage() throws Exception {
        String message = "02003220000000808000000010000000001500120604120000000112340001840";
        System.out.printf("Message = %s%n", message);
        try {
            // Load package from resources directory.
            InputStream is = getClass().getResourceAsStream("/fields.xml");
            GenericPackager packager = new GenericPackager(is);
            ISOMsg isoMsg = new ISOMsg();
            isoMsg.setPackager(packager);
            isoMsg.unpack(message.getBytes());
            return isoMsg;
        } catch (ISOException e) {
            throw new Exception(e);
        }
    }

    private void printISOMessage(ISOMsg isoMsg) {
        try {
            System.out.printf("MTI = %s%n", isoMsg.getMTI());
            for (int i = 1; i <= isoMsg.getMaxField(); i++) {
                if (isoMsg.hasField(i)) {
                    System.out.printf("Field (%s) = %s%n", i, isoMsg.getString(i));
                }
            }
        } catch (ISOException e) {
            e.printStackTrace();
        }
    }
}
When you run the program you’ll get the following output:
Message = 02003220000000808000000010000000001500120604120000000112340001840
MTI = 0200
Field (3) = 000010
Field (4) = 000000001500
Field (7) = 1206041200
Field (11) = 000001
Field (41) = 12340001
Field (49) = 840
The xml packager (fields.xml) can be downloaded from the following link: fields.xml.
Maven Dependency
<dependency>
    <groupId>org.jpos</groupId>
    <artifactId>jpos</artifactId>
    <version>2.1.8</version>
</dependency>

How do I pack an ISO 8583 message?
The code snippet below show you how to pack an ISO 8583 message.
package org.kodejava.jpos;

import org.jpos.iso.ISOException;
import org.jpos.iso.ISOMsg;
import org.jpos.iso.packager.GenericPackager;

import java.io.InputStream;

public class PackISOMessage {
    public static void main(String[] args) {
        PackISOMessage iso = new PackISOMessage();
        try {
            String message = iso.buildISOMessage();
            System.out.printf("Message = %s", message);
        } catch (Exception e) {
            e.printStackTrace();
        }
    }

    private String buildISOMessage() throws Exception {
        try {
            // Load package from resources directory.
            InputStream is = getClass().getResourceAsStream("/fields.xml");
            GenericPackager packager = new GenericPackager(is);

            ISOMsg isoMsg = new ISOMsg();
            isoMsg.setPackager(packager);
            isoMsg.setMTI("0200");

            isoMsg.set(3, "000010");
            isoMsg.set(4, "1500");
            isoMsg.set(7, "1206041200");
            isoMsg.set(11, "000001");
            isoMsg.set(41, "12340001");
            isoMsg.set(49, "840");
            printISOMessage(isoMsg);

            byte[] result = isoMsg.pack();
            return new String(result);
        } catch (ISOException e) {
            throw new Exception(e);
        }
    }

    private void printISOMessage(ISOMsg isoMsg) {
        try {
            System.out.printf("MTI = %s%n", isoMsg.getMTI());
            for (int i = 1; i <= isoMsg.getMaxField(); i++) {
                if (isoMsg.hasField(i)) {
                    System.out.printf("Field (%s) = %s%n", i, isoMsg.getString(i));
                }
            }
        } catch (ISOException e) {
            e.printStackTrace();
        }
    }
}
When you run the program you’ll get the following output:
MTI = 0200
Field (3) = 000010
Field (4) = 1500
Field (7) = 1206041200
Field (11) = 000001
Field (41) = 12340001
Field (49) = 840
Message = 02003220000000808000000010000000001500120604120000000112340001840
The xml packager (fields.xml) can be downloaded from the following link: fields.xml.
Maven Dependency
<dependency>
    <groupId>org.jpos</groupId>
    <artifactId>jpos</artifactId>
    <version>2.1.8</version>
</dependency>
How do I define a filter using @WebFilter annotation?
The following example show you how to create a servlet filter using the @WebFilter annotation. We will create a simple filter that will check whether an attribute is exists in the http session object. If no attribute found this filter will redirect user into a login page.
package org.kodejava.filter;

import javax.servlet.Filter;
import javax.servlet.FilterChain;
import javax.servlet.FilterConfig;
import javax.servlet.ServletException;
import javax.servlet.ServletRequest;
import javax.servlet.ServletResponse;
import javax.servlet.annotation.WebFilter;
import javax.servlet.http.HttpServletRequest;
import javax.servlet.http.HttpServletResponse;
import java.io.IOException;

@WebFilter(urlPatterns = "/*", description = "Session Checker Filter")
public class SessionCheckerFilter implements Filter {
    private FilterConfig config = null;

    public void init(FilterConfig config) throws ServletException {
        this.config = config;
        config.getServletContext().log("Initializing SessionCheckerFilter");
    }

    public void doFilter(ServletRequest req, ServletResponse res,
                         FilterChain chain)
            throws ServletException, IOException {

        HttpServletRequest request = (HttpServletRequest) req;
        HttpServletResponse response = (HttpServletResponse) res;

        //
        // Check to see if user's session attribute contains an attribute
        // named AUTHENTICATED. If the attribute is not exists redirect
        // user to the login page.
        //
        if (!request.getRequestURI().endsWith("login.jsp") &&
                request.getSession().getAttribute("AUTHENTICATED") == null) {
            response.sendRedirect(request.getContextPath() + "/login.jsp");
        }
        chain.doFilter(req, res);
    }

    public void destroy() {
        config.getServletContext().log("Destroying SessionCheckerFilter");
    }
}
Before the birth of @WebFilter annotation as defined in the Servlet 3.0 Specification. To make the filter functional we must register it in the web.xml file by using the filter and the filter-mapping element. And once it active it will collaborate with the other filters in the filter chain for the current servlet context.
Maven dependencies
<dependency>
    <groupId>javax.servlet</groupId>
    <artifactId>javax.servlet-api</artifactId>
    <version>4.0.1</version>
</dependency>
How do I draw a vertical text in Java 2D?
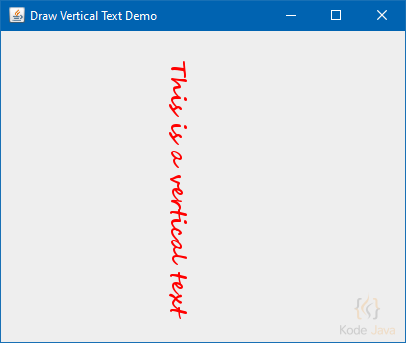
To draw a text / string vertically we need to do a transform on the Graphics2D object. First, create an instance of AffineTransform and set the rotation using the setToRotation() method. And then pass this transform object into g2.setTransform() method.
package org.kodejava.awt.geom;

import javax.swing.*;
import java.awt.*;
import java.awt.geom.AffineTransform;

public class DrawVerticalText extends JPanel {
    public static void main(String[] args) {
        JFrame frame = new JFrame();
        frame.setTitle("Draw Vertical Text Demo");
        frame.setDefaultCloseOperation(WindowConstants.EXIT_ON_CLOSE);
        frame.add(new DrawVerticalText());
        frame.pack();
        frame.setSize(420, 350);
        frame.setVisible(true);
    }

    @Override
    public void paint(Graphics g) {
        Graphics2D g2 = (Graphics2D) g;

        // Define rendering hint, font name, font style and font size
        g2.setRenderingHint(RenderingHints.KEY_ANTIALIASING, RenderingHints.VALUE_ANTIALIAS_ON);
        g2.setFont(new Font("Segoe Script", Font.BOLD, 22));
        g2.setColor(Color.RED);

        // Rotate 90 degree to make a vertical text
        AffineTransform at = new AffineTransform();
        at.setToRotation(Math.toRadians(90), 80, 100);
        g2.setTransform(at);
        g2.drawString("This is a vertical text", 10, 10);
    }
}
Run the snippet, and you’ll see the following screen:
Draw 2D Vertical Text
How do I define a servlet with @WebServlet annotation?
Annotations is one new feature introduces in the Servlet 3.0 Specification. Previously to declare servlets, listeners or filters we must do it in the web.xml file. Now, with the new annotations feature we can just annotate servlet classes using the @WebServlet annotation.
package org.kodejava.servlet;

import javax.servlet.ServletException;
import javax.servlet.annotation.WebInitParam;
import javax.servlet.annotation.WebServlet;
import javax.servlet.http.HttpServlet;
import javax.servlet.http.HttpServletRequest;
import javax.servlet.http.HttpServletResponse;
import java.io.IOException;
import java.io.PrintWriter;

@WebServlet(
        name = "HelloAnnotationServlet",
        urlPatterns = {"/hello", "/helloanno"},
        asyncSupported = false,
        initParams = {
                @WebInitParam(name = "name", value = "admin"),
                @WebInitParam(name = "param1", value = "value1"),
                @WebInitParam(name = "param2", value = "value2")
        }
)
public class HelloAnnotationServlet extends HttpServlet {
    @Override
    protected void doGet(HttpServletRequest request, HttpServletResponse response)
            throws ServletException, IOException {
        response.setContentType("text/html");

        PrintWriter out = response.getWriter();
        out.write("<html><head><title>WebServlet Annotation</title></head>");
        out.write("<body>");
        out.write("<h1>Servlet Hello Annotation</h1>");
        out.write("<hr/>");
        out.write("Welcome " + getServletConfig().getInitParameter("name"));
        out.write("</body></html>");
        out.close();
    }
}
After you’ve deploy the servlet you’ll be able to access it either using the /hello or /helloanno url.
The table below give brief information about the attributes accepted by the @WebServlet annotation and their purposes.
| ATTRIBUTE | DESCRIPTION |
|---|---|
name |
The servlet name, this attribute is optional. |
description |
The servlet description and it is an optional attribute. |
displayName |
The servlet display name, this attribute is optional. |
urlPatterns |
An array of url patterns use for accessing the servlet, this attribute is required and should at least register one url pattern. |
asyncSupported |
Specifies whether the servlet supports asynchronous processing or not, the value can be true or false. |
initParams |
An array of @WebInitParam, that can be used to pass servlet configuration parameters. This attribute is optional. |
loadOnStartup |
An integer value that indicates servlet initialization order, this attribute is optional. |
smallIcon |
A small icon image for the servlet, this attribute is optional. |
largeIcon |
A large icon image for the servlet, this attribute is optional. |
Maven dependencies
<dependency>
    <groupId>javax.servlet</groupId>
    <artifactId>javax.servlet-api</artifactId>
    <version>4.0.1</version>
</dependency>
How do I draw a string in Java 2D?
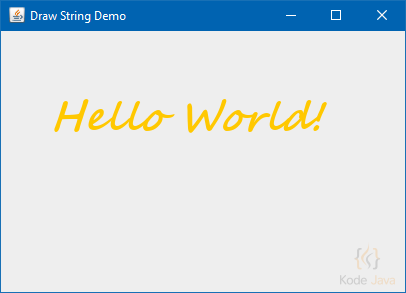
The code snippet below show you how to draw a string using Graphics2D. The drawString() method accept the string to be drawn and their x and y coordinate. Here you can also see how to set the antialiasing mode using the setRenderingHint() method.
package org.kodejava.awt.geom;

import javax.swing.*;
import java.awt.*;

public class DrawString extends JPanel {
    public static void main(String[] args) {
        JFrame frame = new JFrame();
        frame.setTitle("Draw String Demo");
        frame.setDefaultCloseOperation(WindowConstants.EXIT_ON_CLOSE);
        frame.add(new DrawString());
        frame.pack();
        frame.setSize(420, 300);
        frame.setVisible(true);
    }

    @Override
    public void paint(Graphics g) {
        Graphics2D g2 = (Graphics2D) g;

        // Define rendering hint, font name, font style and font size
        g2.setRenderingHint(RenderingHints.KEY_ANTIALIASING, RenderingHints.VALUE_ANTIALIAS_ON);
        g2.setFont(new Font("Segoe Script", Font.BOLD + Font.ITALIC, 40));
        g2.setPaint(Color.ORANGE);

        // Draw Hello World String
        g2.drawString("Hello World!", 50, 100);
    }
}
Run the snippet, and you’ll see the following screen:
Draw 2D String
How do I create a dashed stroke in Java 2D?
package org.kodejava.awt.geom;

import javax.swing.*;
import java.awt.*;
import java.awt.geom.RoundRectangle2D;

public class DrawDashedStroke extends JComponent {
    public static void main(String[] args) {
        JFrame frame = new JFrame("Draw Dashed Stroke Demo");
        frame.setDefaultCloseOperation(WindowConstants.EXIT_ON_CLOSE);
        frame.getContentPane().add(new DrawDashedStroke());
        frame.pack();
        frame.setSize(new Dimension(420, 250));
        frame.setVisible(true);
    }

    @Override
    public void paint(Graphics g) {
        Graphics2D g2 = (Graphics2D) g;
        float[] dash = {10.0f, 5.0f, 3.0f};

        // Creates a dashed stroke
        Stroke dashed = new BasicStroke(2.0f, BasicStroke.CAP_BUTT,
                BasicStroke.JOIN_MITER, 10.0f, dash, 0.0f);

        g2.setStroke(dashed);
        g2.setPaint(Color.RED);
        g2.draw(new RoundRectangle2D.Double(50, 50, 300, 100, 10, 10));
    }
}
This code snippet produce the following output:

Draw 2D Dashed Stroke