
In the past post Installing and Running MongoDB in Windows 7, you’ve seen how to install and running MongoDB database server. Now we are going to learn how to use the MongoDB Java Driver to access collections from the MongoDB database. To demonstrate this I am going to use Maven and IntelliJ IDEA. You can use other IDE of your choice of course, such as Eclipse or NetBeans which also support Maven.
Let’s begin by creating our project in IntelliJ IDEA. I am going to use the community edition of IntelliJ IDEA which is free to download. Here are the steps for creating a Maven project in IntelliJ IDEA.
Creating Maven Project
- Start IntelliJ IDEA. From the Welcome Screen select Create New Project.
- A New Project wizard will be shown. Select Maven on the Sidebar, check the Create from archetype check box and select maven-archetype-quickstart.

Maven Project From Archetype
- Press the Next button to continue.
- In the next screen you can enter the Maven project information details including the GroupId, ArtifactId, and Version.
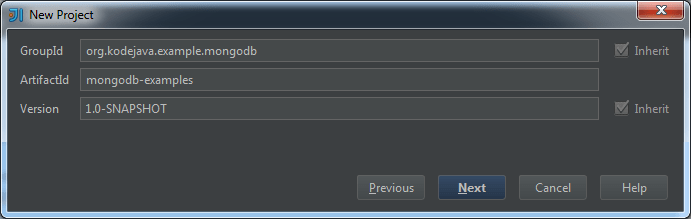
Maven Project Information
- Press the Next button to continue.
- In this screen you can override any Maven configuration setting if you want. And you also see the summary of Maven project to be created. We do not modify the setting in this screen.
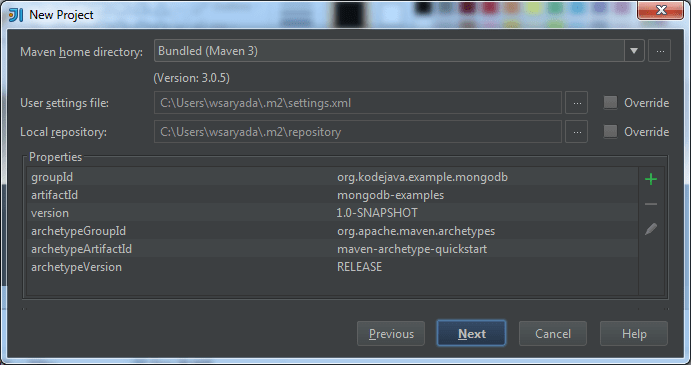
Maven Project Summary
- Press the Next button to continue.
- In the final screen we input the Project name and Project location directory.
- After you input these two information, click the Finish button to generate the Maven project in IntelliJ IDEA.

Maven Project Name and Location
- Finally, you have the Maven project created in IntelliJ IDEA.
- This is the Maven project structure generated in IntelliJ IDEA.

Maven Project Structure
Editing the pom.xml File
- To use the MongoDB Java Driver in our Java application, the first thing we need to do is to add the dependency to MongoDB Java Driver in our
pom.xmlfile. - Add the following dependency configuration to the
pom.xml.
<dependencies>
    <dependency>
        <groupId>org.mongodb</groupId>
        <artifactId>mongo-java-driver</artifactId>
        <version>3.12.10</version>
    </dependency>
</dependencies>
IntelliJ IDEA will download all the required dependency files from the Maven Central repository if they are not available in you local Maven repository. After configuring the Maven, we are now ready to create a simple program to find a single collection from the MongoDB database.
If you are following the last post about installing and running MongoDB that I have mention in the beginning of this article you know that we have a peopledb and persons collections in our MongoDB database. Now we are going to read it using the MongoDB Java Driver in our Java application. So lets now create the application.
Create Java A Simple MongoDB Client
- We create our class under the
org.kodejava.mongodbpackage. Right-click on this package and choose New, Java Class to create a new class. - Type in the class name
MongoDBHelloWorld, and press OK button. - And this is the full code snippet for the
MongoDBHelloWorldclass.
package org.kodejava.mongodb;

import com.mongodb.*;
import com.mongodb.client.FindIterable;
import com.mongodb.client.MongoCollection;
import com.mongodb.client.MongoDatabase;
import org.bson.Document;

import java.util.Objects;

public class MongoDBHelloWorld {
    public static void main(String[] args) {
        // Creates a new instance of MongoDBClient and connect to localhost
        // port 27017.
        MongoClient client = new MongoClient(
                new ServerAddress("localhost", 27017));

        // Gets the peopledb from the MongoDB instance.
        MongoDatabase database = client.getDatabase("peopledb");

        // Gets the persons collections from the database.
        MongoCollection<Document> collection = database.getCollection("persons");

        // Gets a single document / object from this collection.
        Document document = collection.find().first();

        // Prints out the document.
        System.out.println(Objects.requireNonNull(document).toJson());
    }
}
- If you run this code, you will get the following output printed on the screen.
{"_id": {"$oid": "61910b09dd20c0a0d8f686cd"}, "firstName": "John", "lastName": "Doe", "cityOfBirth": "New York"}
- This is the JSON document that we’ve store in our
peopledbin the MongoDB database.
The Java class above is our first example of how to use the MongoDB Java Driver to access and read a document from the MongoDB database. I hope this example can be a good start for us to learn more about MongoDB. If you have any question, just submit it in the comment section below this article. See you on the next post. Thank you!
Maven Dependencies
<dependencies>
    <dependency>
        <groupId>org.mongodb</groupId>
        <artifactId>mongo-java-driver</artifactId>
        <version>3.12.11</version>
    </dependency>
</dependencies>


- How do I create a servlet filter to make secure cookies? - April 18, 2024
- How do I configure secure cookies using web.xml? - April 18, 2024
- How do I create a table with multiple header in iText 8? - March 16, 2024
How to give username and password?